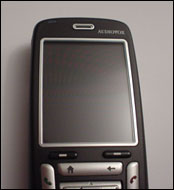
SMT5600 / C500 Disassembly and Dust Fix Instructions
Learn how to disassemble, clean and fix the dust behind your screen for you Audiovox SMT5600 Smartphone. Also compatible with the Orange SPV C500, Qtek 8010, i-Mate SP3, and any other HTC Typhoon model.
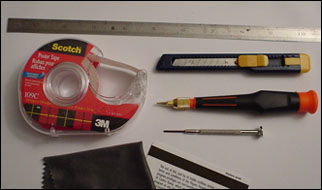
MATERIALS:
3M Removable Scotch Poster Tape
T5 (SMT5600) / T6 (C500) Torx Screwdriver
Small Phillips Screwdriver
Utility Knife
Old Plastic Credit Card or Similar
Lint Free Cloth or a Small Can of Compressed Air
Glass or Plastic Surface
Ruler
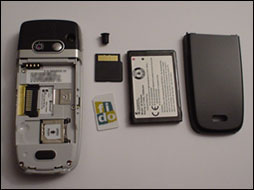
1. Open the battery cover and remove the battery, Mini SD card and SIM Card. And remove the rubber plug by the digital camera mirror.
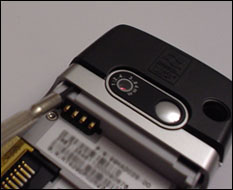
2. Take the small Phillips screwdriver and put it through the small rectangular opening located above the battery compartment on the right side and push the small black tab inside the opening while pushing up on the top cover until the cover pops up a little, then do the same to the opening on the left side. Note: I used a S1.5 slotted screwdriver.
3. When both sides of the top cover are released, push the cover up a little and then push it forward to slide off the top cover. Note: There are two tabs at the top of the cover as well, do not force it off.
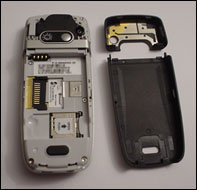
4. Unscrew all 6 screws with the T5/T6 Torx screwdriver. Please note that there is a screw under the VOID sticker also.
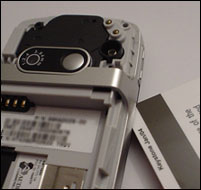
5. Used an old credit card or any plastic card to slide along the side and top seam between the front and back housing. Once the top and the sides of the cover is released pull the back housing up a little and push the back housing downwards to fully release the cover and to clear the Mini USB and headphone plug.
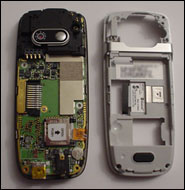
6. Unscrew one Phillips screw at the circuit board with a small Phillips screwdriver.
7. Gently open the front cover from the circuit board at the left side with the phone facing downwards. Leave the cable on the right side attached.
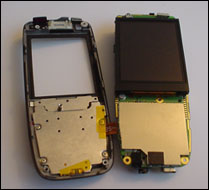
8. Clean the LCD and the LCD window with a lint free cloth or compressed air.
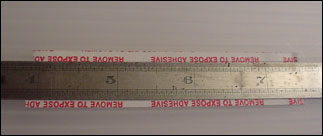
9. Place a long strip of 3M Scotch Poster Tape on a glass or plastic surface and cut 4 3mm strips, 2 strips 3.5cm in length and 2 strips 5cm in length using the utility knife and the ruler.
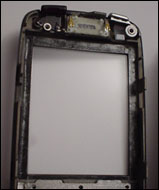
10. Remove the paper backing on the tape to expose the adhesive surface and place the 3.5cm strips along the top and bottom inside the front cover around the LCD window and place the 5cm strips on the sides. Do not allow the tape to be shown within the transparent LCD window. Place the strips outside the window on top of the foam seal. Ensure that there is a continuous seal of poster tape. If there is a gap add a small strip of tape to fill it. Note: I used a screwdriver to help with the placement of the tape, tweezers can also help.
11. Place the circuit board and the front cover back together. Screw back in the Phillips screw and apply gentle pressure around the LCD to ensure a firm seal. Note: Make sure that both the LCD and the LCD window is clean and free from dust and other debris before fully sealing the LCD to the front cover. If you have already fully sealed the two together and discover some dust that you missed please see the ‘Seal Removal’ instructions.
12. Reassemble the phone. And when done apply firm pressure around the LCD window.
Seal Removal
1. Disassemble the phone.
2. When opening the circuit board from the front cover you’ll find that the LCD is attached to the front cover. At the bottom corner of the LCD use a small slotted screwdriver pry the LCD and the cover apart.
3. Remove the poster tape.
4. Reassemble the phone.
Note: 3M Removable Scotch Poster Tape is available at any office supply store. An alternative is double sided transparent tape but it is hard to remove and cut.
Disclaimer: Please note that opening your phone will void your warranty and please do so at your own risk.


Hello webmaster
I would like to share with you a link to your site
write me here [email protected]